Showing posts with label Thanksgiving. Show all posts

Thursday, December 1, 2016

Throw Back Thursday: Blooming with Love

Hi All!

For my last Fall card of 2017, I have a throw-back for ya!  Who remembers this one? Blooming with Love. It's a classic and I don't think it could ever go out of style.


It features a wheelbarrow of leaves.  Nothing epitomizes fall more...except maybe a pile of leaves.  I stumbled across this card from 2008 designed by Atomic Butterfly and changed a spring themed card to fall one.  These definitely aren't traditional fall colors, but I love them together.

Most of these products are unfortunately retired, but hopefully it will inspire you to pull out some of those oldies but goodies you have laying around.  If you'd like to add any products to your collection, just pop me an email or click on the 'Order Online' icon in the top right-hand corner.  Thanks for stopping by!

Stamps: Always Thankful & Blooming with Love
Paper: Island Indigo, Riding Hood Red, Crumb Cake and Whisper White Cardstock; Bandstand Simply Scrappin DSP
Ink: Jet Black Stazon; Basic Black Pad for Blending the Wheelbarrow
Accessories: Large Scallop Edgelit, Island Indigo 1/4" Satin Ribbon, Riding Hood Red Marker, Island Indigo Marker, Crushed Curry Marker, Blender Pens and a Black Brad

Acorny Thank You

Hi All!

Acorny Thank You is a stamp set that's been around a while now and it never really popped for me. Until...I saw a card on Pinterest and fell in love.  That happens quite a bit for me.  I see one card and I'm sold.  Anyone else?


I love acorns.  And what's great about this set is that there's a coordinating punch that allows you to create lots of fun combinations. My card is a CASE of this card by Mindy over at Bada-Bing!  She kept hers pretty classic and simple.  I decided to add in some DSP.  I did just notice that I forget to add in the Linen Thread, which I may just need to do.  I love it paired with the Kraft cardstock.

Item ID: 139718 Acorny Thank You $15.00

Item ID: 139681 Acorn Punch Builder $18.00

Acorns are great for fall projects and when paired with the Acorn Builder Punch, they are the perfect combination.  If you'd like to add these to your collection, pop me an email or click on the 'Order Online' icon in the top right-hand corner.  Thanks for stopping by!

Stamps: Acorny Thank You
Paper: Rich Razzleberry, Whisper White and Kraft Cardstock; Moonlight DSP
Ink: Rich Razzleberry, Crushed Curry, and Basic Black Classic Pads
Accessories: Acorn Punch Builder, Layering Circle Framelits, Paper Piercer, Piercing Template and Pop-Dots/Dimensionals

Wednesday, November 30, 2016

A Grateful Bouquet

Hi All!

I know, I know.  The Thanksgiving Holiday is over, but I had a couple of cards that I hadn't gotten posted yet, so I wanted to get those taken care of before I move on to Christmas ;)

I knew for one of my fall cards I wanted to use the Jar of Love stamp set and throw in some fall colors. Well, I tried some oranges and yellows and just couldn't get anything to come together. {Finding coordinating colors for 2-step stamping can be tricky sometimes.} In the end, I settled on some corals.


My inspiration for the card was this gorgeous stunner from Libby.  *swoon*  I kept the same basic design, but used Basic Gray for the background and Crisp Canteloupe and Calypso Coral for the flowers.  These colors together are beautiful.

Item #: Jar of Love $52.00
Item #: 130658 Magnetic Platform $40.00

I love this set and feel it's a must-have for any collection. Great for any occasion/holiday/season. If you'd like to add this or any other products to your collection, pop me an email or click on the 'Order Online' icon in the top right-hand corner.  Thanks so much for stopping by!

Stamps: Jar of Love & Falling Leaves
Paper: Basic Gray, Crisp Canteloupe, Calypso Coral and Very Vanilla Cardstock
Ink: Basic Gray, Crisp Canteloupe, Calupso Coral and Crumb Cake Classic Pads
Accessories: Magnetic Platform, Everyday Jars Framelits, Paper Piercer and Template

Sunday, December 28, 2014

Truly Grateful

Hi All,

I'm a bit behind on my posts...so before I share my Christmas cards, I should definitely get caught up on Thanksgiving.  I'm not sure where the time goes between holidays, but I think it speeds up double time...lol!

This card is straight from the annual catalog (pge 153).


I loved how they used the stamp image from the Truly Grateful stamp set to create the print on the leaf.  So clever...and what a cool effect.  The leaves used on the card are from the Autumn Accents Bigz Die.  It has five leaves of different sizes and shapes.  From there, it's just lots of layers: burlap, lace, DSP and an embossed background. The original card used the Crushed Curry Chevron Ribbon {super cute} instead of the lace, but I mistakenly ordered the Crushed Curry Striped Ribbon and it was a bit too busy to add.  **lesson learned, double check your Items before you confirm your order**  Ha Ha!

There is definitely more going on with this card than I normally would do, but it all works together pretty nicely.  If you have a love of leaves {as I do}, the Autumn Accents Bigz Die is a must have.  If you'd like to add them to your collection, pop me an email or click on the 'Order Online' icon in the top right hand corner.  Thanks so much for stopping by!

Autumn Accents Bigz Die: 127812  $21.95

Truly Grateful: Clear 131733  $19.95 / Wood 131730  $27.95

Stamps: Truly Grateful
Paper: Crushed Curry, Baked Brown Sugar, Old Olive and Very Vanilla Cardstock; Newsprint DSP
Ink: Chocolate Chip & Baked Brown Sugar (Sponged on Edges) Classic Pads
Accessories: Autumn Accents Bigz Die, Ticket Corner Punch, Burlap Ribbon, Victoria Lace, Vintage Wallpaper Embossing Folder, Antique Brads, Crushed Curry Maker, Sponge, Glue Dots and Pop Dots/Dimensionals

Thursday, November 7, 2013

Going Gingham

Hi All,

Happy Friday (almost)! To close out the week, I have another fall themed card for you.  It is a CASE of this gorgeous card by Jen over at Ladybug Designs. 


I loved all of the elements that she pulled together, especially the addition of the plaid.  What a great pop of color!  She used the Orchard Harvest DSP, but I had just gotten the Gingham wheel and used it to create mine.  It's in the 2013-2014 catalog and fits on the standard handle.

I don't have the stamp-a-majig that would probably make it easy to roll this wheel straight, so I was experiencing some technical difficulties.  In the end, I rolled the wheel on a strip of paper and actually trimmed it down.  That worked much better!

Jen had also used Core'dinations Cardstock and sanded it down. This paper sands down nicely, whereas the regular card stock does not. I didn't have it in this shade, so I did the next best thing.  I sponged on some Craft White Ink to my plain 'ol cardstock.  It gives the paper a similar worn look.  It was one of those A-Ha moments.

Although this card has a lot of elements, it still has a very simple look.  I love that about it!  If you would like to add any of these products to your collection, just click on the Order Online icon in the top right-hand corner or pop me an email.

Thanks so much for stopping by!

Stamps:  Apothecary Art; Gingham Wheel
Paper: Chocolate Chip, More Mustard, Cajun Craze & Whisper White Cardstock
Ink: More Mustard Classic Pad & Whisper White Craft Pad
Accessories: Stripes Embossing Folder, Standard Handle, Leaf Dies, Naturals Designer Buttons, Linen Thread, Cajun Craze Candy Dots, Sponge and Glue Dots

Saturday, October 8, 2011

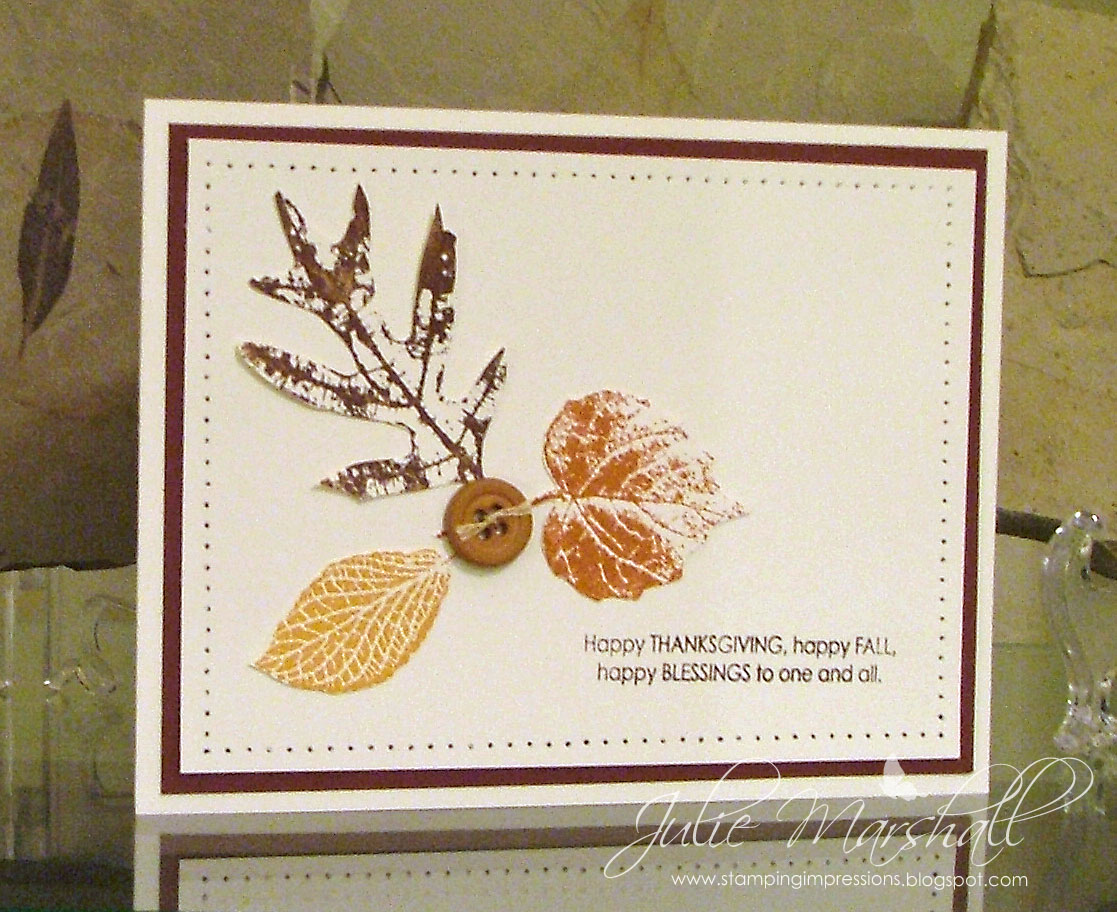
PP67: Happy Thanksgiving, Happy Fall

Hi Everyone! This week at the Paper Players, Jaydee has a wonderful Color Challenge for us: Bravo Burgundy, More Mustard, Cajun Craze and Very Vanilla.


They scream fall to me, so that's the direction I took. I immediately thought of the leaves from the French Foliage set. I originally tried the R
ock 'N Roll technique, but the leaves didn't have enough color for me, so I decided just to stamp the leaves in these three colors.


I guess I went CAS again this week, as I have lots of white space. Bravo Burgundy is the color that really popped out for me, so I used that as my pop of color in the added layer and the sentiment. The leaves are cut out, so they add a nice dimension to the card. Lots of white space = paper piercing to me, so I added a bit of that to finish it all off.

Have you started your Thanksgiving cards yet? Maybe this color combo will inspire you to do so. If so, be sure to pop on over to the Paper Players to see what the other talented designers have created for you...or better yet, to upload your own project. We'd love to see it! Thanks so much for stopping by.

The Paper Players Design Team

Ann Schach

Jaydee

LeAnne Pugliese

Lesley Croghan

Ann Marie Hile

Tara Bilbao

Nance Leedy

Cindy Hall (October Guest Designer)

Stamps: French Foliage & Falling Leaves
Paper: Bravo Burgundy & Very Vanilla
Ink: Bravo Burgundy, Cajun Craze & More Mustard
Accessories: Mat Pack & Paper Piercer, Yellow Button, Embroidery Floss and a Glue Dot

Friday, October 15, 2010

Fabulous Foliage

I saw this beautiful card by Dawn Olchefske and had to recreate it. I love the colors and the design...not to mention, it's using my new favorite stamp set, French Foliage.

What caught my eye was the square shadow that's part of the focal image. You use SU's Clear Blocks to create this effect. I used size 'D' here.

To create this look:
1. Ink up the block on your stamp pad and stamp off two times.
2. Stamp it on your cardstock. I used Crumb Cake for this step.
3. Run the edge of the block around a darker color and stamp over the original image. I used Early Espresso for this step.

I would have loved to have added some Early Espresso ribbon to this, but I didn't have any. So, I improvised with one of my must have items - Linen Thread. I tied it threw a button and ended up with a piece of art. I Love it!

Thanks for stopping by.

Stamps: French Foliage & Falling Leaves
Paper: Early Espresso, Crumb Cake & Very Vanilla Cardstock
Ink: Cajun Craze, Early Espresso & Crumb Cake Classic Ink
Accessories: Clear Block D, Linen Thread and a Very Vanilla Button

Saturday, October 9, 2010

French Foliage

When I say that this stamp set is a must-have, it truly is. Not only can you use it for Fall, but, it has a cute little circular Paris stamp and a French Script stamp. Both of these can be used with other themed stamp sets (think Artistic Etchings ;) In two words...It's Versatile.

This card is straight out of the Holiday Mini. I used the same design, but switched it up a little. I added ribbon and stamped the 'Grateful' sentiment directly on the mat. I just couldn't make the tag on the original card work for me.

I must disclose that the Grateful sentiment is from another stamp set - Falling Leaves. I bought it for the sentiment and for the cute leaves and acorn it has. The Grateful works well with this card, but you could use any other sentiment that you have.

I will be making more designs with this set, so you'll be getting lots of ideas for it. Thanks for stopping by!

Stamps: French Foliage & Falling Leaves
Paper: Early Espresso, Cajun Craze, More Mustard and Very Vanilla Cardstock
Ink: Early Espresso, Cajun Craze, More Mustard & Crumb Cake Classic Pads
Accessories: 1/4" Chocolate Chip Grosgrain Ribbon & Pop Dots/Dimensionals

Paper Strip Pumpkins

I'm a sucker for pumpkins...any kind! So when I saw these in our Stampin' Success Demo Magazine, I had to make them. They were a definite hit at my last workshop.

For the paper, I used the new Autumn Spice DSP. It's a heavier weight paper which I think you'll need for these. Cardstock would work as well. Here are the instructions:

1. Cut (9) 3/4" x 6" strips of paper.
2. Stack them print side up and punch two holes
in each end. You will need a Crop-A-Dile
type tool to get through the layers.
3. Adhere a 5/8" Jumbo Brad to one end - this will be the bottom. Fan out all the strips in an even circle.
4. Pull the strips up alternating opposite sides and adhere at the top with a 5/16" Brad. This will be the top.

5. Now embellish your pumpkin as you like. I used a Leaf Die, a Button and a Curly Cue made by wrapping a thin strip of cardstock around a pencil.

They're too cute! You could make a couple different designs and put them in a cute little tin or basket. Instant Fall Decor. Would love to see yours if you make some, so be sure to leave me a link. Thanks for stopping by!

Stamps: None
Paper: Old Olive Cardstock; Autumn Spice DSP
Ink: None
Accessories: 5/8" & 5/16" Brads, Crop-A-Dile, Leaf Die, Green Buttons, Linen Thread and Pop Dots/Glue Dots

Autumn Spice

Autumn Spice...doesn't it just conjour thoughts of Fall? Well, that's the DSP that I used on this card. The Fall patterns are colored in Cajun Craze, Old Olive, More Mustard and Early Espresso. It's perfect for all those Thanksgiving cards you'll be making next month. There's not a bad print in the pack.

I still feel like this card is missing something, but I've exhausted all the possibilities....so, it is what it is. Hope you like it...thanks for stopping by!

Stamps: Teeny Tiny Wishes & Falling Leaves (inside of card)
Paper: Cajun Craze, Old Olive & More Mustard Cardstock; Autumn Spice DSP
Ink: Chocolate Chip Classic Pad
Accessories: 1/4" More Mustard Grosgrain Ribbon, Scallop Trim Border, Scallop Oval XL Punch, Modern Label Punch, Leaf Button, Linen Thread, Paper Piercer & Mat Pack

Saturday, October 31, 2009

Decorative Mini Pumpkins

Are these the cutest pair of pumpkins you have ever seen? Yet another way to use our punches. These are made with the Scallop Oval Punch. For the tall pumpkin, the ovals are folded vertically. For the smaller pumpkin, they are folded in half horizontally.

Punch (11) Scallop Ovals from your cardstock. Sponge the edges with Creamy Caramel Ink. Fold all (11) ovals in half, with the sponging on the inside. Apply adhesive to one outside edge of the folded oval and attach the backside of another oval. Continue until they are all connected like an accordian and you can adhere the last two edges together. Your sponged edges should be facing out when completed. Roll a small piece of Chocolate Chip cardstock for the stem and stick in the top hole. Curl some Old Olive Cardstock for the vine/leaf and adhere in the top hole.

The small pumpkin is the most level and is easy to stand up. I am still challenged with getting the taller pumpkin to stand alone, but wanted to share it as an alternate option.

Use these for place settings or just decorations around the house.

TFL!

Stamps: None
Paper: Pumpkin Pie, Chocolate Chip and Old Olive Cardstock
Ink: Creamy Caramel Classic Stamp Pad
Accessories: Scalloped Oval Punch & Sponges


Oval Punched Pumpkins

Who doesn't love pumpkins: Pumpkin Pie, Pumpkin Cookies, Pumpkin Roll & 3-D Pumpkins for your cards??? These are super cute and can be made from any orange cardstock or designer paper.

This is a good example of how to use those punches we collect. These use the Small and Large Oval Punches. Punch 3 same size ovals out of your paper. Adhere two of the ovals by slightly overlapping them. Then, take the third oval and adhere it with a pop dot in the center of the other two ovals. Adhere some ribbon for the stem and curl some cardstock for the leaf and you have pumpkins. I made one large and two small pumpkins for this card.

Love them!!!
TFL

Stamps: Holiday Best (Hostess Set)
Paper: Chocolate Chip, Pumpkin Pie, Old Olive and Very Vanilla Cardstock; Pumpkin Pie Patterns DSP
Ink: Chocolate Chip Classic Stamp Pad
Accessories: Swiss Dots Embossing Envelope, Chocolate Chip Brads, Mat Pack & Paper Piercer, 1/4" Old Olive and Chocolate Chip Ribbon and the Small & Large Oval Punches.

Bashful Fall Leaves

A friend of mine sent me a project idea for these leaves...and I knew I had to try them. I cut a pair of each leaf out of old book pages (Persuasion by Jane Austen, if you must know), adhered them together and traced the edges with Platinum Stickles. They are absolutely beautiful!

I experimented with many different color combos, but decided on Kraft, Soft Suede and Bashful Blue. I think it works *wink*. The colors are not your traditional fall colors, but now-a-days we're experimenting more and thinking outside the box. Give it a try on your next Holiday card. Use some colors you normally wouldn't!

Hope you like it & TFL!

Stamps: Teeny Tiny Wishes
Paper: Kraft, Soft Suede, Whisper White, Blue Designer Paper & some Old Book Pages
Ink: Soft Suede Classic Stamp Pad
Accessories: Leaf Dies, Eyelet Border Punch, Platinum Stickles, Bashful Blue 1/4" Grosgrain Ribbon and 1/2" Soft Suede Polka Dot Ribbon.

Saturday, October 10, 2009

Olive Stitched Thanksgiving


Well, this was a bugger of a card to get made! I started the week out working on the Mojo Challenge, but then stumbled upon this stitched pumpkin...and the rest is history.

He is the cutest thing and 'sew' (pun intended..hee hee) easy to make. Punch out a circle using the 1 3/8" circle punch, then using your paper piercer, pierce around the edge (be sure you end up with an even amount of holes.) Grab a needle, thread it up and sew through the holes. Who knew???

I have tons of DMC floss from my cross-stitching days, so I grabbed one that matched the Old Olive Ribbon and stitched away. If you don't have floss, it can be purchased at any Craft Store, is very inexpensive and comes in many, many colors. I used two strings of the floss to sew.

To finish out the card, I used the retired SU! Stitched background stamp. It seemed only fitting with my sewn pumpkin. I also added a clear button to the ribbon, because if you didn't know, buttons are the new must have accessory!

I love how this turned out....it just took a while to get there ;) If you love it too, I will make this available as a Make & Take kit at my Open House on Saturday, October 17th for $3. Stop by and pick one up.

Stamps: Teeny Tiny Wishes & Stitched (Retired SU!)
Paper: Very Vanilla, Old Olive & Dusty Durango Cardstock; Fall DSP
Ink: Old Olive Classic Stamp Pad
Accessories: 1 3/8" Circle Punch, Paper Piercer, Old Olive 1/4" Grosgrain Ribbon, SU! Clear Buttons, Linen Thread, Dimensionals, Mini Glue Dots, DMC Floss and a Small Needle

Sunday, September 13, 2009

Crushed Suede Thanksgiving

Although it's still over 100 degrees in Arizona, I'm trying to transition to fall colors. Here's my first go at our new In Colors: Soft Suede, Dusty Durango and Crushed Curry. They are just perfect for Fall!

I haven't ordered any new fall themed stamp sets YET, so I had to go into the archives for this one. This is the Season of Friendship Set and it can literally be used for every season: Flowers for Spring, Snowflakes for Winter, Leaves for Fall and a cute little bird to throw in any time ;)

I chose to use the leaves and stamped them in the Crushed Curry and Dusty Durango. The tree is stamped in Soft Suede. I ordered the Soft Suede Ribbon last week, but haven't received it yet, so I had to go a different route for my focal image. I've seen 'banners' popping up all over blogs, so I thought I would give one a try. I just cut a strip of cardstock, measured in about an inch, scored a line, measured in another 1/4 inch and scored again. Then, repeat on the other end. This creates a fold so the banner can pop up. I clipped the ends and added buttons, and Ta-Da, a banner is born!

Hope you like it! TFL.

Stamps: Season of Friendship & Teeny Tiny Wishes
Paper: Soft Suede, Dusty Durango and Whisper White Cardstock
Ink: Soft Suede, Dusty Durango and Crushed Curry Classic Pads
Accessories: Piercing Tool and Mat Pack, Hemp Twine, Modern Label Punch, Movers & Shapers, Designer Buttons-Buttons Latte