Showing posts with label Christmas. Show all posts

Monday, January 1, 2018

Elfen Wishes

Hi All!

Is he not the cutest???  Until I did one final search of Pinterest for Holiday Catalog items, I had never even noticed him.  I would have been sooo sad to miss out.


I colored him in using my Aqua Painter and added two sheets of the Merry Little Christmas DSP for the background.  He's part of a pretty great set that has stamps for Christmas, Halloween and Valentine's Day.  So versatile!

Item# 144960 Festive Phrases $17.00

Item# 144621 Merry Little Christmas DSP $11.00

These products are both in the Holiday catalog and are not being carried over.  They are available till January 2nd or while supplies last.  If you'd like to add any of these products to your collection, pop me an email or click on the 'Order Online' icon in the top right-hand corner.  Thanks for stopping by!

Stamps: Festive Phrases
Paper: Old Olive and Whisper White Cardstock; Merry Little Christmas DSP
Ink: So Saffron and Old Olive Classic Pads, Jet Black Stazon
Accessories: Aqua Painter, Paper Piercer/Mat Pack, Large Silver Sequins and Fine Tip Glue Pen

A Serene Scene

Hi All!

Who doesn't like a nice, peaceful snowy scene?  We don't really get those here in Phoenix, but this die cut helps in creating them on cards.


These trees were created using the Card Front Builder Thinlits Dies. I die cut the trees, backed the negative design with a sheet of the Merry Little Christmas DSP and then off-set the die cut images.  I got the idea here from Tamara Bertram.  So simple to make, but such a pretty design.

Item# 144674 Card Front Builder Thinlits Dies $30.00

Not only do these dies include the trees, but they help in creating a frame for your cards, a night scene and some cool corners.  The night scene would be cute for baby cards---I need to try that out ;)

Item# 144621 Merry Little Christmas DSP $11.00
Item# 139672 Softly Falling Embossing Folder $8.50

Both of these products are in the Holiday Catalog and will not be carried over.  They are available till January 2nd or while supplies last.  If you'd like to add any of these to your collection, pop me an email or click on the 'Order Online' icon in the top right-hand corner.  Thanks for stopping by!

Stamps: All Holidays
Paper: Whisper White and Merry Little Christmas DSP
Ink: Old Olive Classic Pad
Accessories: Card Front Builder Thinlits Die Cuts, Softly Falling Embossing Folder, Gold Sequins  and Pop Dots/Dimensionals

Cheers to the Year

Happy New Years All!

It's 2018 and a whole new year for creativity!  But first, some 2017 housekeeping to finish up. Here are some of the last cards I made for the holidays.


For my first card, I paired up the Winter Wonder embossed snowflake with the Cheers to the Year stamp set.  I hadn't taken much notice of this set, but it is perfect for the holidays and weddings.  Not a pairing you naturally think of, but this set is pretty great.  I love the images.

Item# 144925 Cheers to the Year $18.00

It's currently in the 2017 Holiday Catalog and not carrying over, so it's a Last Chance item available through January 2 or until stock runs out.  If you'd like to add this or any other products to your collection, pop me an email or click the 'Order Online' icon in the top right-hand corner.  Thanks for stopping by!

Stamps: Cheers to the Year
Paper: Very Vanilla and Holiday DSP
Ink: Real Red and Chocolate Chip Classic Pads
Accessories: Winter Wonder Embossing Folder, Circle Nestabilities and Pop Dot/Dimensionals

Monday, December 26, 2016

A Very Merry Moose

Hi All,

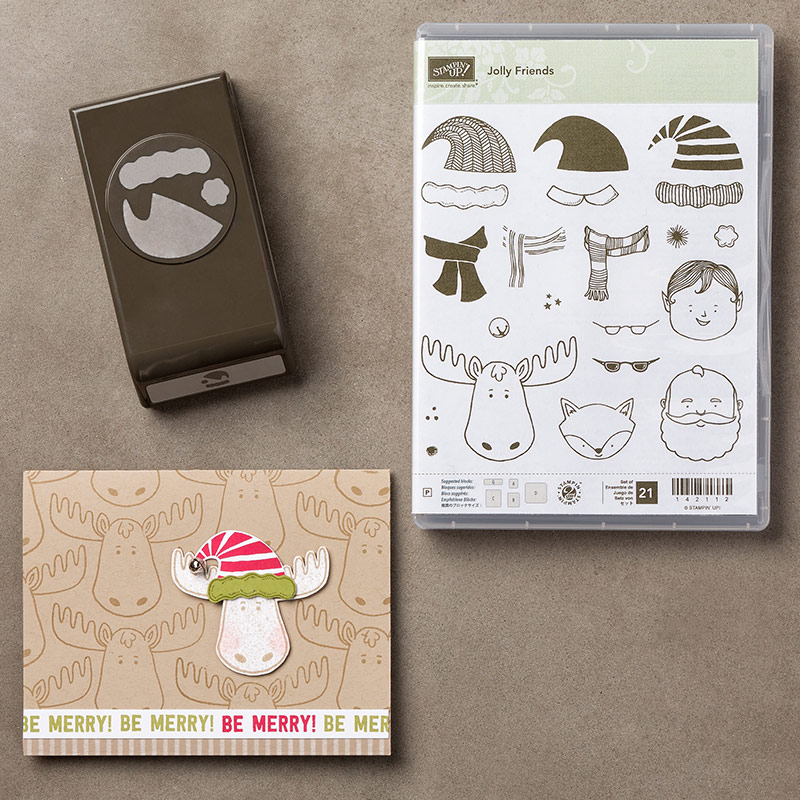
Is this guy not the cutest???  Who can resist a moose?  And, paired with a santa hat?  I sure couldn't!


This card was inspired by the great Kimberly VanDiepen over at Stampin by the Sea.  She does such a great job of adding whimsy to cards.  This guy is quite enough on his own...but throw in some ribbon and snowflakes and you have a unique holiday card.  Love it!

Unfortunately, this set is retiring.  Fortunately, it is at a great price right now.  If you didn't already get it for this year's cards, it would be a great addition for next year.  It has some other super cute images as well.

Item # 142112 Jolly Friends $13.60
Item # 143511 Jolly Friends Bundle $29.50
Item # 142066 Merriest Wishes $17.00

Item # 137910 Sequin Trim-Bermuda Bay $5.00

Item # 104199 Linen Thread $4.50

If you'd like to add this or any of the other products to your collection, pop me an email or click on the 'Order Online' icon in the top right-hand corner.  Thanks for stopping by!

Stamps: Jolly Friends, Merriest Wishes and Serene Snowflakes
Paper: Crumb Cake and Whisper White Cardstock
Ink: Bermuda Bay, More Mustard, Chocolate Chip Classic Pads; Cotton White Stazon pad
Accessories: Jolly Hat Builder Punch, Scallop Border Punch, Bermuda Bay Sequin Trim, Crochet Trim, Linen Thread, Sponge, Paper Snips, Glue Dots and Pop Dots/Dimensionals

Merriest Wishes

Hi All,

Aside from the holidays to be excited for, SU! has some great deals going on for retiring stamp sets. Some of them you may already have.  Some you may not.  This one was a favorite at my last workshop and probably my favorite from all of the holiday sets.  It was inspired by this card over at Do Lally Crafts.  So simple, yet it packs a big punch!


Not only can it be used for cards, but it will make cute tags as well.  The layering between the stamps and the Die Cuts add so much dimension.  Plus, I just love the fonts they've chosen!

Item # 142066 Merriest Wishes $17.00
Item # 141835 Merry Tags Framelits Dies $12.50

Item # 132622 Gold Foil Sheets $4.00

This Bundle originally went for $40.50 and is now discounted to $29.50.  Such a great deal!  If you'd like to add this to your collection, pop me an email or click on the 'Order Online' icon in the top right-hand corner.  Thanks for stopping by!

Stamp: Merriest Wishes
Paper: Real Red and Whisper White Cardstock; Gold Foil Sheets
Ink: Real Red & Old Olive Classic Pads
Accessories: Merry Tags Framelits Dies, Ribbon, Glue Dots and Pop Dots/Dimensionals

It's The Most Wonderful Time of the Year

Hi All,

It is the Most Wonderful Time of the Year!  I hope the holidays have gotten off to a good start for you. They are time well spent with family and friends.  We are spending a quiet day at home and I figured it was high time I got some cards uploaded.

This set below didn't get much hype in the catalog.  I had barely noticed it until I saw this card by The Lady & Her Stamps and I had to have it.


I don't have many larger image stamps, so it fills a niche for me.  I love it because you can embellish away and the card speaks for itself.

Item # 142158 Wonderful Year $20.00
Item # 139672 Softly Falling $8.50
Item # 121790 Red Glimmer Paper $5.00
Item # 141701 Delicate White Doilies $3.00
Everything on this card is currently available.  If you'd like to add any of these to your collection, pop me an email or click on the 'Order Online' icon in the top right-hand corner.  Thanks for stopping by!

Stamps: Wonderful Year
Paper: Crumb Cake and Cherry Cobbler Cardstock; Red Glimmer Paper
Ink: N/A
Accessories: Softly Falling Embossing Folder, Doilies, Cherry Cobbler & Garden Green Markers, Baker's Twine and Pop Dots/Dimensionals

Thursday, January 1, 2015

Be Joyful

Hi All,

Happy New Year!  Can you believe it's 2015 already?  It's a whole new year...full of all new possibilities.  Can't wait to see what it has to offer!

For my first two posts of the new year, I will be finishing up my holiday projects. Are we tired of Christmas yet????  I know....I promise to move on soon ;) My first project is a treat holder using the Curvy Keepsake Box Thinlits Die.


It was made using Raspberry Ripple Cardstock and this gorgeous Silver Glimmer Paper. It adds just the perfect amount of bling! Using the die, you cut out one side of the box in each color.  Adhere the bases together and bring them together at the top.  To finish it off, this die has 3 different styles of tags to choose from.  I chose the oval and paired it with a Snowflake Charm and some Raspberry Ripple ribbon.  The sentiment is from the Project Life Holiday Cheer stamp set.  I thought this would be perfect for these tags, as the sentiments are relatively small. 


Project Life Holiday Cheer 135188 Photopolymer $15.95

All is Calm Snowflake Embellishment: 137383 $6.95

I was a bit uncertain about this die, as I wasn't sure of the size.  But, I gave it a shot.  It's actually a very nice size.  For scale, it will easily hold 5 Hershey Kisses or 4-5 Dove chocolates.  Perfect for party treats! This box is so versatile and can be used for any holiday, party or office treat.  It makes them so quick and easy to make.  If you'd like to add this to your collection, pop me an email or click on the 'Order Online' icon in the top right-hand corner.  Thanks for stopping by!

Curvy Keepsake Box Thinlits Die: 135853 $32.95

Stamps: Project Life Holiday Cheer
Paper: Raspberry Ripple and Very Vanilla Cardstock & Silver Glimmer Paper
Ink: Raspberry Ripple Classic Pad
Accessories: Curvy Keepsake Box Thinlits Die, All is Calm Snowflake Embellishments, Raspberry Ripple Stitched Satin Ribbon and Linen Thread

Monday, December 29, 2014

Ornamental Pine

Hi All,

For my last workshop of the year, I held a Holiday workshop at the end of November.  I found quite a few cards on Pinterest this year that spurred me to purchase a few new Holiday stamp sets.  This was one of them that we used at the workshop:  Ornamental Pine

 
I was inspired by this card from Deb over at ARTfelt Impressions.  I loved the rustic feel...and the snow effect was simply amazing.  I just had to recreate!  Although I kept the same basic design, I switched up the finishing touches.  I added some Washi Tape for a pop of color and a simple sentiment.  The Washi Tape was a bit too wide, so I cut it in half lengthwise.  Worked perfectly!

The front panel was cut using Oval Nestabilities and popped up with pop dots.  The pine needles were stamped on the background and the pine cone was cut out and adhered to the branch.  It adds even more dimension to the card.

I love how this turned out and it makes me wish I was holed up in a cabin for the holidays. We don't get snow here in sunny Phoenix, so this is the closest I get unless I'm going north to Flagstaff.  Hope you enjoyed this one as much as I did.  If you'd like to add any of these products to your collection, pop me an email or click on the 'Order Online' icon in the top right-hand corner. Thanks so much for stopping by!

Ornamental Pine: Clear 135107 $18.95 / Wood 135104  $25.95

Stamps: Ornamental Pine & Itty Bitty Backgrounds
Paper: Crumb Cake and Soft Suede Cardstock
Ink: Chocolate Chip (Sentiment) & Early Espresso (Pinecone) Classic Pads; Whisper White Craft Pad
Accessories: Garden Green & Chocolate Chip Markers, Oval Nestabilities, Season of Style Washi Tape, Sponge and Pop Dots/Dimensionals

Sunday, December 28, 2014

Holiday Swap '14

Hi All,

Earlier this month, I got together with the girls and we had our 2nd Annual Holiday Card Swap. Each designed their own card and brought all of the supplies for the rest of us.  I am always amazed at everyone's creativity...and it's so much fun to sit down and actually make cards I haven't designed :)

Below are the cards that my uber talented girls came up with:


This card was a partnership between Gina and Lana.  Gina designed and Lana cut.  {I sure wish I had cutting help each month ;}  I had always wanted to try one of these trees, so I was super excited to see that we were going to be doing one together.  It is surprisingly easy and is just 1/2 of a scalloped circle folded to create the different branches.  Here's a quick tutorial if you'd like to try it out: Folded Tree Techinique.  I also *love* the Lucky Stars Embossing folder used for the background.  Most of these products are in the Holiday Mini and are only available till January 5th.

Trim the Tree DSP Stack: 135824  $6.95

Lucky Stars Textured Embossing Folder: 135817  $7.95

Paper: Garden Green, Cherry Cobbler and Whisper White Cardstock; Trim the Tree DSP Stack
Accessories: Lucky Stars Embossing Folder, Large Scalloped Circle Die, Cherry Cobbler 1" Sheer Linen Ribbon, Old Olive Baker's Twine and 1/8" Mini Brads.


This card was another partnership between Gina and Lana.  Gina designed this beauty of a card.  The first thing I noticed were the beautiful blue hues.  They are just gorgeous.  She used a Masking technique to create  the moon.  This was also something that I hadn't really done before.  I found a great tutorial on Splitcoast Stampers if you'd like to give it a try: Masking Technique.  This focal image is mounted on the Northern Flurry Embossed background, but you could also cut this circle out and place the focal image on the inside of the card so it shows through the front.  Either way, it makes a beautiful card!  

Lovely as a Tree: 127793 Clear $19.95 / 128655 Wood $27.95

Northern Flurry Embossing Folder: 120902  $7.95

Stamp: Lovely as a Tree
Ink: Marina Mist and Not Quite Navy Classic Pads; Black StazOn
Accessories: Sponge, Post-It Notes, Northern Flurry Embossing Folder, Circle Nestabilites, 2-Way Glue Pen, Dazzling Diamonds Glitter


This is yet another card from Gina.  She is a fellow SU! Demonstrator and made these as card fronts for a swap.  She made more than she needed, so she brought them for us.  I believe, all in all, she made 25 of these.  That's a ton of work and many kudos to her!  All we had to do was pick one out and mount it on some cardstock.  All of these products can be found in the Holiday Mini and are only available till January 5th.  White Christmas is a super popular stamp set and these Snowflake Frosted Sequins were a Must-Have for my collection.

All is Calm DSP: 135823  $12.95

Frosted Sequins: 135835  $4.95

White Christmas: 135767  $15.95

Paper & Ink: Lost Lagoon Cardstock & Classic Pad
Accessories: Apothecary Accents Framelits, 2-Way Glue Pen, Dazzling Diamonds Glitter, Red & Yellow Markers, Sponge

This cute little card was designed by Mary Beth.  She created a central focal image by embossing the top 1/3 edge of the cardstock and turning to emboss the other 1/3 of the edge of the cardstock.  Such a simple technique with a lot of punch. I adore snowflakes and snowmen, so this card was right up my alley.    


My final card was designed by Linda.  She took this simple tree die cut and blinged it up to create an Easel Card.  Another technique I had not done before.  The card can be mailed flat, but when opened, the gifts at the bottom are 3 Dimensional and act as a base for the tree fold.  She also shared another trick with us.  The punch under the sentiment was cut out twice in two colors: white and green.  Since these are both the same size, she cut the green one in half and adhered each half to the edge of the white sentiment.  This gives the affect of a layer.  So Clever!

We had such a great time and we all came away with such great ideas.  It's so fun to share and I'm so thankful to have these ladies to share with.  Can't wait to create again in 2015! Hopefully you are inspired to try something new as well!


Friday, December 27, 2013

Happy Holidays!

Hi All,

I hope you had a wonderful holiday!  My mom, aunt and uncle were in town, so we enjoyed quite a bit of family time.  I had hoped to get this post done prior to all of the holiday excitement, but it didn't happen.  So, let this be inspiration for your 2014 Holiday cards!

A few weeks ago I hosted my first Shoebox Swap.  Have you participated in one before?  They are so much fun!  Each person designs a card and brings all of the supplies for that card for everyone to make.  There were four of us and a couple of girls brought multiple projects...yes, I am lucky to know some over-achievers :)

This was my card for the swap.  I used one of my new favorite stamp sets: Snow Day.  It is available in the Holiday Mini and is a must have for your collection.  Snowmen are just adorable to begin with, but throw in a super cute chevron hat and you have a winner.  I saw cards popping up on Pinterest with this set and had to have it.  I combined these two fabulous cards to create mine: Snow Day Border Card by SereneStamper and Warm Wishes by Rubberfunatics.


This card uses a hand-drawn frame technique.  It looks so very "fancy", but is so very easy.  Tina Weller has a fabulous Youtube video to show you how it's done (just click on her link above).  All you need is a Black Marker and some Grid Paper.  This stamp set is perfect for this technique!

My friend Mary Beth designed two cards:


This card uses two pretty cool techniques.  The first is an emboss using only 3/4 of the embossing folder.  This leaves a flat space at the bottom to stamp your sentiment.  The second technique is one I've been wanting to try for quite some time now.  You punch out some squares from the patterned paper and then you use a corner round to punch opposite sides of the square.  I love the effect that it gives!


Mary Beth's second card uses another embossing folder.  It's hard to see in the pic, but it embosses a brick wall.  Very cool as you can use the embossed side or the debossed side.  You stamp the card first, then run it through the Big Shot to emboss.  It adds the perfect amount of texture.  And, I love it paired with the tree and Grunge Me.

The next card is from a new customer of mine Linda, who has been welcomed into our group.


Her design was based around this wreath stamp. It is a nice size stamp, so you really don't need a lot of embellishing.  We added some red rhinestones, a sentiment banner and finished it off with a bit of ribbon.  A simply elegant card.

The final card is from a fellow SU Demonstrator, Gina.  I also know her as she was a teacher I worked with at my son's Elementary school.  Her and I must have been on the same wavelength as she chose the same stamp set I did: Snow Day.  Great minds think alike!!!


Her snowman is just as cute!  I love that we could show two ways to use this set.  Mine uses more neutral colors and a Whisper White snowman and Gina's combines blues and reds with the new Smoky Slate ink.  One thing we both had in common, we used rhinestones with the snowflakes.  They're just cuter that way!

It's not too late to work on Holiday cards.  Create while you're still in the holiday cheer and you'll have a head start on next year.  I love the Snow Day set and feel it's timeless.  It's a must-have for your collection.

If I don't stop back in before next week, have a fun and safe New Year's and I'll see you in 2014!  Thanks for stopping by this year!

Julie's Card:
Stamp: Snow Day
Paper: Crumb Cake, Whisper White and Basic Black Cardstock
Ink: Whisper White Craft Pad; Basic Black, Smoky Slate, Cherry Cobbler and Chocolate Chip Classic Pads
Accessories: Basic Black Stampin' Write Marker, Grid Paper, Rhinestones

Mary Beth's 1st Card:
Stamp: More Merry Messages
Paper: Old Olive and Very Vanilla Cardstock; DSP
Ink: Cherry Cobbler Classic Pad
Accessories: Square Punch, Corner Rounder, Snowflake Embossing Folder, Red Brads and Pop Dots/Dimensionals

Mary Beth's 2nd Card:
Stamps: Grunge Me, Season of Joy
Paper: Whisper White and Cherry Cobbler Cardstock
Accessories: Brick Embossing Folder

Linda's Card:
Stamp: Wreath Stamp
Paper: Naturals and Whisper White Cardstock
Ink: Garden Green and Really Red Classic Pads
Accessories: Red Rhinestones and Sheer Red Ribbon

Gina's Card:
Stamp: Snow Day
Paper: Pool Party, Really Red and Whisper White Cardstock
Ink: Smoky Slate, Real Red, Pool Party, Chocolate Chip and Basic Black Classic Ink
Accessories: Rhinestones

Saturday, December 15, 2012

A Candlelight Christmas

Hi All,

Happy Saturday!  We are enjoying a wonderfully rainy day here in AZ.  Perfect for hanging our house lights, huh?  Luckily, the hubs got the lights up before it really started to come down this afternoon.  We were lucky to actually be hanging them, as we couldn't find any A4 lights anywhere.  He cleaned out Target as soon as they got back in stock :)

I have a super simple card for you today, but it packs a big punch! I got the idea, once again, from Kimberly Van Diepen over at Stampin' by the Sea.  She created this fabulous DSP circle that I couldn't resist trying.  Here is my version:


For my circle, I chose to use the Candlelight Christmas DSP.  I cut out multiple circles in the size that I wanted.  I then stacked the circles and cut them in half, in half again, and then cut each section in half. This will give you eight sections to piece together.  I decided on a pattern and pieced them together on a scrap piece of paper.  Once glued down, I cut the patterned circle out.  This is much easier than trying to design with eight separate sections.

I found through trial and error that it's better to stack the circles together, as this way, they are pretty unison in size.  I cut them individually the first time and they were all a bit different in size.  In the end, it really doesn't matter.  When you piece them together, focus on getting the outside of the circle uniform.  If the centers don't perfectly match up, you can cover them with the sentiment and it won't be seen anyways.

This is the perfect way to use up those scraps.  Pair it up with some embossing, a cute punch and a button and twine, and you have a perfectly beautiful card that you could easily make over and over with many different print combinations.  I love it!

My must have product from this card: Candlelight Christmas DSP (Item #126901) .  The prints in this pack are gorgeous. If you'd like to add this to your collection, just pop me an email or click on the Shop Online button in the top right hand corner.  Thanks so much for stopping by!

Stamps: Four the Holidays
Paper: Early Espresso, Lucky Limeade, Real Red & Whisper White Cardstock; Candlelight Christmas DSP
Ink: Early Espresso Classic Ink
Accessories: Stripes Embossing Folder, Scallop Edge Border Punch, Circle Nesties, Designer Buttons-Naturals, Linen Thread, Glue Dots and Pop Dots/Dimensionals

Sunday, December 25, 2011

Merry Christmas

Hi All,

Happy Holidays! I hope that each of you are enjoying the day with your family and friends. We got together with my family yesterday, so it's a nice quiet relaxing day at home for us.

I made sure to squeeze in a few minutes to upload my last card of the holiday season. It is a paper pieced tree. I saw this tree on a tag that Jennifer Timko had designed and just had to recreate it.


I loved the papers she chose to use, so I kept those the same. They are 1 3/4", 1 1/2", 1 1/4", and 1" squares cut in half on the diagonal and stacked. How clever is that? I paired them up with some Crumb Cake card stock, kept the design simple and added some seam binding. What a cute card that you could replicate with so many different Designer Series Papers.

Hope you like it and will file it away for your 2012 holiday card designs. Thanks for stopping by and hope you enjoy the rest of your holiday weekend!

Pin It

Stamps: All Holidays
Paper: Crumb Cake Card stock; Frostwood Lodge DSP
Ink: Cherry Cobbler Classic Pad
Accessories: Corner Rounder, Cherry Cobbler Seam Binding, Early Espresso Quilted Satin Ribbon, Cherry Cobbler Baker's Twine, Crumb Cake Button and Dimensionals/Pop Dots